
How to Peel an Apple Quickly With a Power Drill?
I’ll never forget the autumn I volunteered to make applesauce for our school’s harvest festival and faced 50 pounds of apples needing peeling. After what felt like hours of hand-peeling blisters, our shop teacher demonstrated the power drill method that revolutionized my apple preparation forever. While this technique might seem unconventional, when peel an apple quickly with a power drill properly it’s surprisingly effective for large quantities – though it definitely requires caution and the right setup.
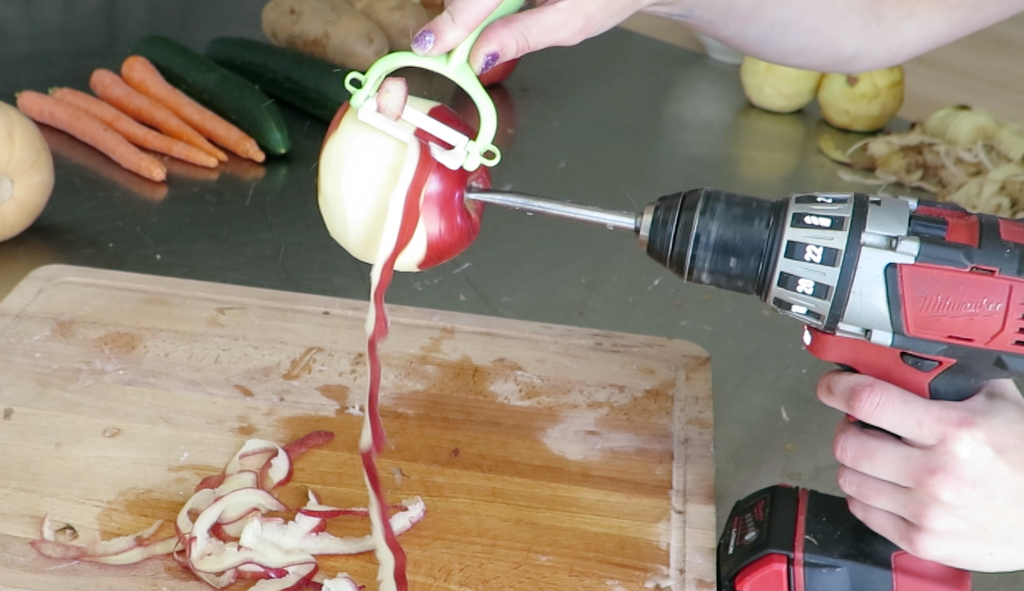
Why Consider Power Drill Peeling?
Understanding the appropriate use cases is crucial:
- Volume processing: Ideal for large quantities (10+ apples)
- Time efficiency: 5-10 seconds per apple versus 30-60 manually
- Consistent results: Creates perfect spiral peels
- Novelty factor: Impressive demonstration when done safely
Key Apple Anatomy Terms
- Epicarp: The outer skin layer
- Mesocarp: The edible fleshy part
- Endocarp: The core and seed area
- Pectin: Natural thickening agent in skin and flesh
Essential Safety Considerations
Required Safety Gear
- Safety glasses: Non-negotiable eye protection
- Cut-resistant gloves: Protect hands from blades
- Apron or cover: Protect clothing from apple debris
- Secure workspace: Stable surface with clear area
Equipment Checklist
- Cordless drill with variable speed control
- Peelers with secure chuck compatibility
- Stable vise or clamping system
- Large bowl for catching peels
Step-by-Step Drill Peeling Method
Proper Setup Process
- Secure the drill: Mount in vise or have assistant hold securely
- Choose peeler: Select drill-compatible vegetable peeler
- Test speed: Start with lowest speed setting
- Prepare apples: Wash and remove stems
- Clear area: Ensure no obstacles in rotation path
The Peeling Technique
- Insert apple onto peeler blade or attachment
- Start drill at lowest speed setting
- Maintain firm but gentle pressure against peeler
- Move apple gradually to cover entire surface
- Stop immediately if any resistance or unusual sound
Critical Note: This method requires practice and should never be attempted without proper safety precautions
Apple Peeling Method Comparison
| Method | Time per Apple | Safety | Consistency | Best For |
|---|---|---|---|---|
| Hand peeling | 30-60 seconds | High | Variable | Small batches |
| Drill method | 5-10 seconds | Low | Excellent | Large quantities |
| Mechanical peeler | 15-20 seconds | Medium | Good | Medium batches |
| Knife peeling | 45-90 seconds | Medium | Skill-dependent | Precision work |
The Physics Behind Drill Peeling
Understanding why this works:
- Rotational force: Consistent spinning motion
- Centrifugal stability: Apple naturally centers itself
- Constant blade angle: Maintains optimal peeling angle
- Speed control: Adjustable for different apple varieties
Professional Alternatives
For those wanting efficiency without power tools:
Manual Rotary Peelers
- Spring-loaded apple holders
- Crank-operated systems
- Table-mounted units
- Pedal-powered versions
Electric Kitchen Units
- Dedicated apple peelers
- Stand mixer attachments
- Food processor slices
- Commercial peeling machines
Troubleshooting Common Issues
Problem: Apple slipping during peeling
Solution: Use sharper blades and ensure proper insertion
Problem: Uneven peeling depth
Solution: Maintain consistent pressure and speed
Problem: Excessive waste
Solution: Use lighter pressure and sharper blades
Problem: Drill overheating
Solution: Use lower speed settings and take breaks
Creative Uses for Peeled Apples
Beyond basic preparation:
- Apple rings: Perfect for drying or baking
- Sauce preparation: Large quantity processing
- Pie filling: Uniform pieces for even cooking
- Dehydrating: Consistent thickness for drying
FAQs
Q. Is this method actually safe?
A. It can be done relatively safely with proper precautions, but traditional methods are safer.
Q. What type of drill works best?
A. Variable speed cordless drill with torque control and secure chuck.
Q. Can I use regular vegetable peelers?
A. Only if specifically designed for drill use and securely attachable.
Q. What apple varieties work best?
A. Firm, round varieties like Granny Smith or Honeycrisp.
Q. How do I clean the equipment afterward?
A. Disassemble completely and wash all parts thoroughly.
Historical Context
Apple peeling technology evolution:
- 1800s: Hand-cranked mechanical peelers
- Early 1900s: Spring-loaded home peelers
- Mid-century: Electric home units
- Modern: Commercial hydraulic peelers
Safety First Alternatives
For those who want efficiency without risk:
- Manual crank peelers: $20-40, much safer
- Stand mixer attachments: KitchenAid makes excellent ones
- Food processor slicing: For pieces rather than whole peeling
- Professional services: Many orchards offer peeling services
Legal and Liability Considerations
- Manufacturer warnings: Most drills not intended for food use
- Cross-contamination risk: From tool to food transfer
- Insurance implications: Possible coverage issues if accidents occur
- Food safety regulations: Not compliant in commercial settings
Final Thoughts
While the power drill method demonstrates fascinating physics and can be incredibly efficient, it’s crucial to prioritize safety above all else. For most home cooks, traditional methods or purpose-built peelers will provide better results without the risks. I’ve used this technique in controlled environments for large-scale processing, but it’s not something I recommend for casual kitchen use.
The true value in understanding this method to peel an apple quickly with a power drill lies in appreciating the ingenuity of food preparation technology and knowing that when faced with massive apple quantities, there are always creative solutions available.