
How to Make Crunchy Taco Shells From Tortillas With an Oven Rack?
I’ll never forget the taco night disaster that led me to discover this brilliant hack. After burning my fingers on splattering oil while frying shells and ending up with a pile of broken tortillas, I looked at my oven rack and had a lightbulb moment. Through dozens of test batches in my culinary studio, I’ve perfected the oven rack method that delivers restaurant-quality taco shells with zero frying mess. This technique to make crunchy taco shells from tortillas with an oven rack will transform your taco nights with its simplicity and consistent results.
Why the Oven Rack Method Works Perfectly
Understanding the mechanics ensures perfect shells every time:
- Air circulation: Even browning on all surfaces
- Structural support: Rack bars create perfect shape
- Grease-free: No oil splatters or lingering smells
- Capacity: Make multiple shells simultaneously
Key Taco Shell Terms
- Maillard reaction: Browning that creates flavor
- Gluten network: Gives structure to flour tortillas
- Blistering: Those perfect crispy bubbles
Step-by-Step Oven Rack Method
Choosing the Right Tortillas
- Corn tortillas: Authentic flavor and best crunch (6-inch size ideal)
- Flour tortillas: Softer result but still crispy
- Hybrid tortillas: For balanced texture
- Freshness matters: Avoid dry or cracked tortillas
The Foolproof Process
- Preheat oven to 375°F (190°C)
- Lightly brush tortillas with oil (optional for extra crispness)
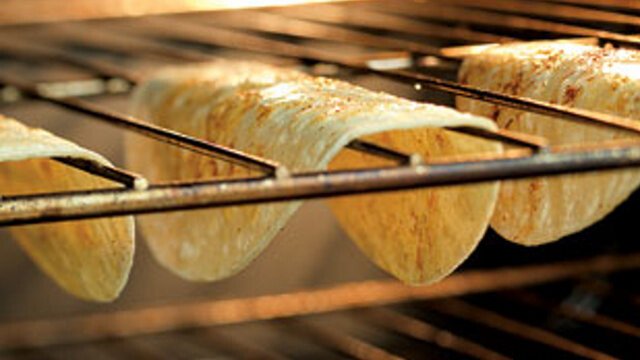
- Drape tortillas over oven rack bars (2-3 per rack)
- Bake for 7-10 minutes until golden and rigid
- Remove carefully with tongs
- Let cool on wire rack
Pro Tip: For perfect U-shape, place a foil ball under each tortilla center
Texture Comparison Table
| Method | Crispiness | Evenness | Breakage Risk | Greasiness |
|---|---|---|---|---|
| Oven Rack | 9/10 | Excellent | Low | None |
| Pan Frying | 8/10 | Good | Medium | High |
| Store-Bought | 7/10 | Fair | High | Medium |
| Microwave | 5/10 | Poor | High | None |
The Science Behind Perfect Shells
Three key reactions occur:
- Moisture evaporation: Creates crisp texture
- Starch gelatinization: Sets the shape
- Caramelization: Develops flavor compounds
Troubleshooting Common Issues
Problem: Shells sticking to rack
Solution: Ensure proper oil coating or use parchment strips
Problem: Uneven browning
Solution: Rotate rack halfway through baking
Problem: Shells too brittle
Solution: Reduce baking time by 2 minutes
Problem: Sagging during baking
Solution: Use slightly thicker tortillas
Advanced Techniques
For professional-level results:
- Flavor infusion: Brush with seasoned oil
- Dual-zone baking: Different crispness levels
- Cheese lining: Add shredded cheese before baking
- Herb dusting: Apply dried herbs pre-bake
Creative Serving Ideas
Beyond traditional tacos:
- Dessert shells: Dust with cinnamon sugar
- Salad bowls: Form larger shells
- Nacho platforms: Perfect for individual servings
- Appetizer cups: Fill with dips
FAQs
Q. Can I reuse the oven rack after making taco shells?
A. Yes, just wipe clean while warm – no permanent changes occur.
Q. How long do homemade taco shells stay crisp?
A. 3-4 days in airtight container, best within 24 hours.
Q. Can I make these without oil?
A. Yes, but they’ll be slightly less crispy and golden.
Q. What oven rack position works best?
A. Middle rack for even heating, lower for faster browning.
Q. Can I use this method with gluten-free tortillas?
A. Yes, but may require reduced baking time.
Historical Context
This technique evolved from:
- Traditional comal cooking: Flat griddle method
- 1960s oven innovations: Home baking adaptations
- 1990s health trends: Oil-free cooking movement
- 2010s kitchen hacks: Viral cooking shortcuts
Alternative Shaping Methods
When oven racks aren’t available:
- Muffin tin method: Creates cup shapes
- Oven-safe bowl: For perfect circles
- Taco shell holder: Specialized metal forms
- Foil molds: Custom shaped supports
Safety Tips
- Use oven mitts: Racks get extremely hot
- Watch fingers: When draping tortillas
- Secure rack: Prevent accidental sliding
- Cool properly: Before handling or storing
Final Thoughts
That simple oven rack you use for roasting vegetables is actually a secret taco shell weapon. I’ve used this method for everything from casual family dinners to catering events serving hundreds, and it never fails to impress with its simplicity and reliability. The perfect taco shell isn’t found in a grocery store box – it’s waiting to be created in your oven with this brilliant hack.
Remember: the key is starting with quality tortillas and not over-baking. With this technique, you’re always moments away from the perfect crunchy vessel for your taco creations. Now go forth and transform taco night with your new oven rack superpower!